STEP 3 · BODY SCAN

Body Scan Measurement Guide

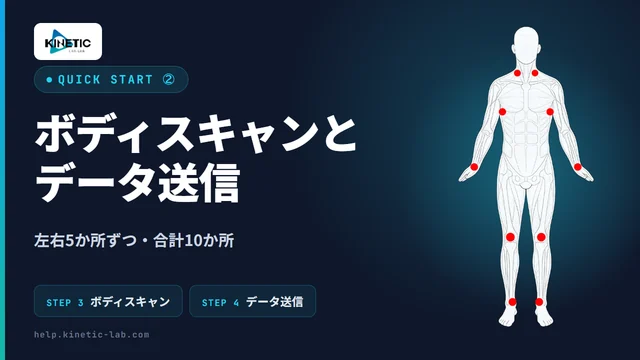
You measure 5 points on each side — 10 in total, working from the top of the body (the head) downward. The 5 points below have strictly defined locations. Use the illustrations to confirm the exact spot.

STEP 1
Registration
Register account & code
STEP 2
Sensor connection
Connect & check battery
STEP 3 ◀ You are here
Body scan
Measure 10 points in order
STEP 4
Send data
Send via QR scan
3:49 Watch the video

You can also watch how to measure

If reading through the page is hard going, start here. The video covers the whole flow — preparation, all 10 measurement points, and sending your data.

Play on YouTube (opens in a new tab)

For accurate data

Preparation & precautions before measuring

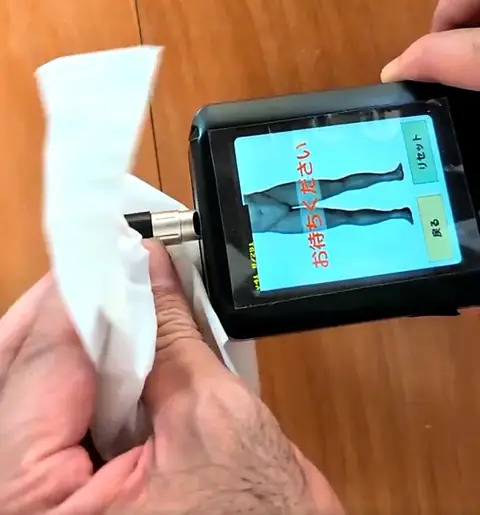
By the nature of the sensor, the surface condition of your skin (moisture, oils, chemicals) can cause measurement errors or fluctuating data. Always check before measuring.

💧

Wipe off sweat

Required

Sweat on the skin prevents an accurate reading. Completely wipe off sweat at the measurement area with a dry towel or paper.

🚫

No sunscreen / antiperspirant

Required

Sunscreen, antiperspirant, and body cream interfere with measurement. If any is applied, wipe it off or wash it away before measuring.

🩹

Prosthetic limbs / casts

Tip

At the relevant spot, select and confirm "Reset" → "Set to 0" on the sensor screen before continuing. It's a legitimate way to detect whole-body balance, and the results are reliable.

💡
Practical tip: keep "alcohol wipes (wet tissues)" on hand and clean the skin right before measuring to greatly reduce measurement errors.

How to measure

How to place the sensor

Place the silver tip of the sensor gently into the hollow at each measurement point. Make sure the metal part sits flush against the skin with no gap. Measuring takes a little time — work slowly, without rushing.
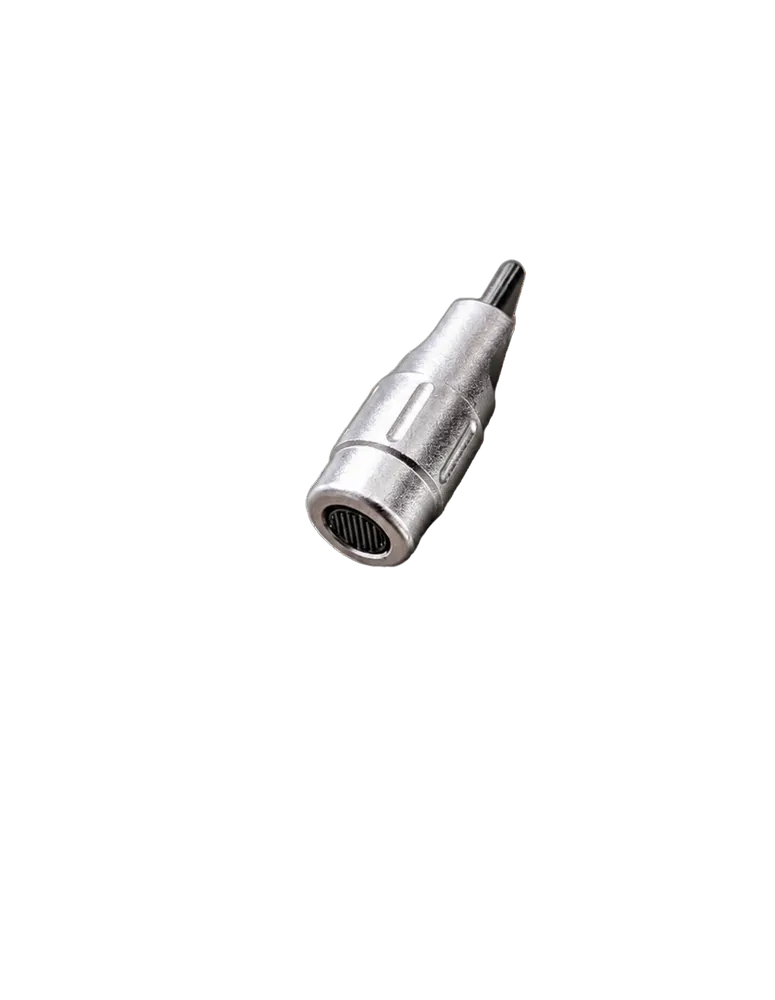
The silver tip of the sensor
Place this silver tip into the hollow

Which hand holds the sensor

Hold the sensor in the hand opposite the side you are measuring. When you move to the other side, switch hands before measuring.

  • !Measure the right side with your left hand, and the left side with your right hand.

When the measurement does not work

In a very dry environment the measurement may not start, or may return an error — dry skin or dry air is the cause. Take a shower or wipe the skin with an alcohol wipe before use. If it still does not work, apply pressure to the part touching the skin as you measure.

  • !When you apply pressure, make sure every location receives the same pressure.

Measurement order

Measurement order

Measure from the head downward, in left-right sets. The illustration for each point is arranged in numerical order.

12 34 56 78 910

5 points on each side — 10 in total

Measure from the top of the body (the head) downward, in left-right sets. The red dots are the measurement points. Confirm the exact location of each point one by one in the illustrations below.
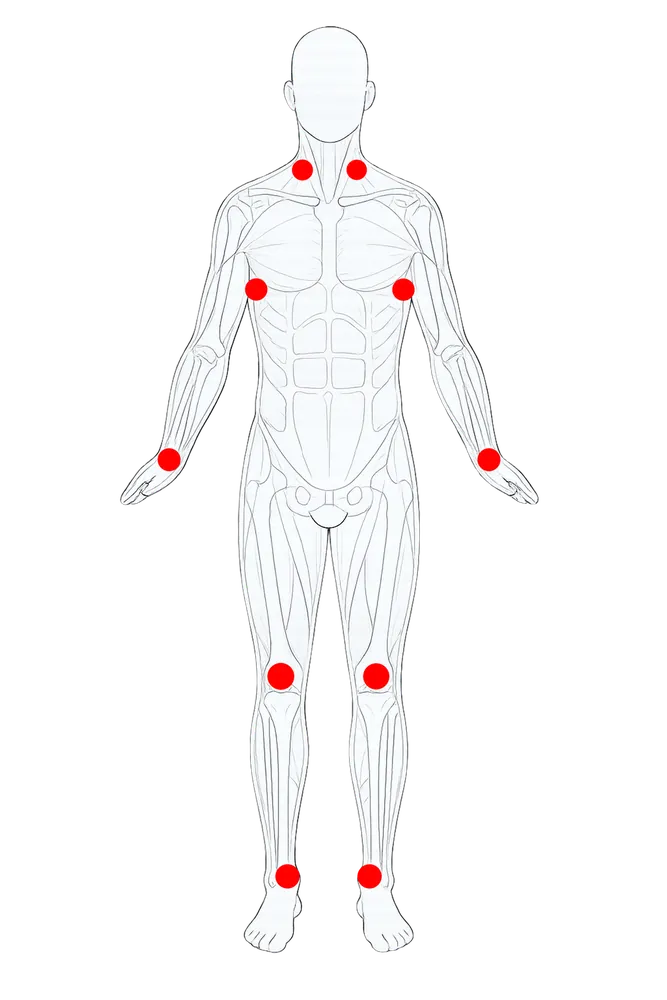
  • !All figures are official anatomical illustrations. The red dot is the center of where to place the sensor.
  • !Measure the same spot on both sides (10 points in total).
The 10 measurement points on the whole body (red dots)
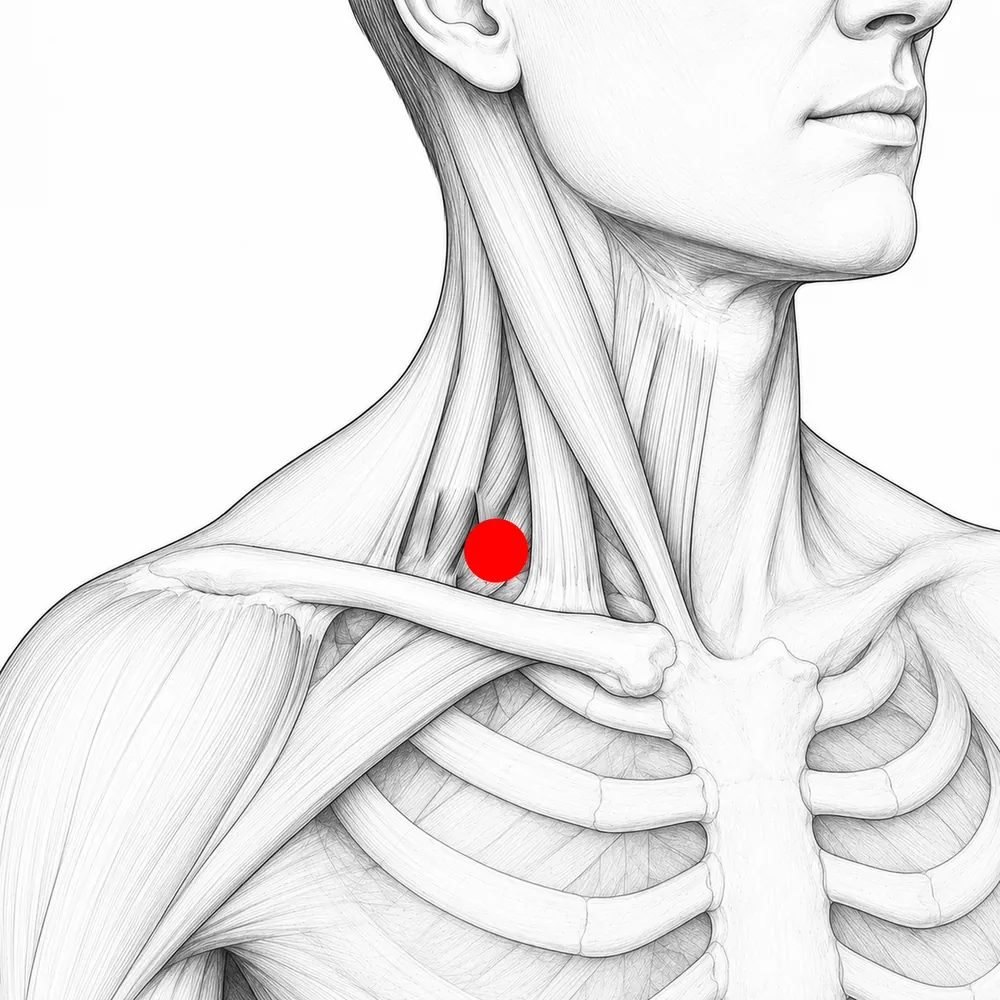
FIG.01 / NECK · CLAVICLE Scalene muscle (side of the neck) measurement location: behind the sternocleidomastoid, in the hollow above the collarbone (red dot) ANATOMICAL REFERENCE
① · ② Order 1 → 2 (both sides)

Scalene muscle (side of the neck)

Measure behind the sternocleidomastoid muscle (the posterior triangle of the neck), in the hollow above the collarbone.
  • 1Turn your head slightly to the side to reveal the thick muscle (sternocleidomastoid).
  • 2The triangular hollow just behind that muscle and just above the collarbone is your landmark.
  • 3Measure the same spot on each side.
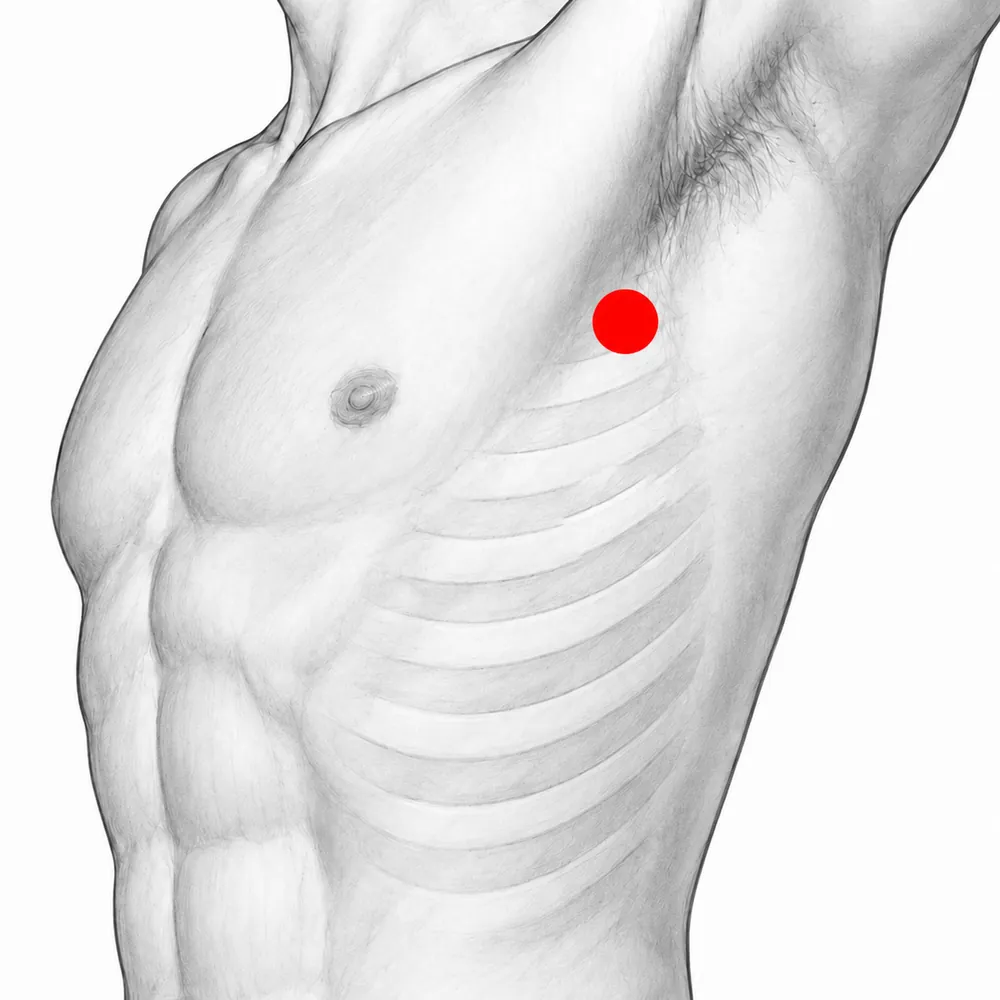
FIG.02 / LATERAL CHEST Lateral chest (under the arm) measurement location: middle of the side of the ribcage, slightly above the nipple line (red dot) ANATOMICAL REFERENCE
③ · ④ Order 3 → 4 (both sides)

Lateral chest (under the arm)

Measure under the arm, at the middle of the side of the ribcage, slightly above the line connecting the left and right nipples.
  • 1Raise your arm slightly and run your fingers down the side of your body (the ribs) from the armpit.
  • 2Using the nipple line as a reference, aim slightly above it, around the middle of the side of the body.
  • 3Measure the same height on each side.
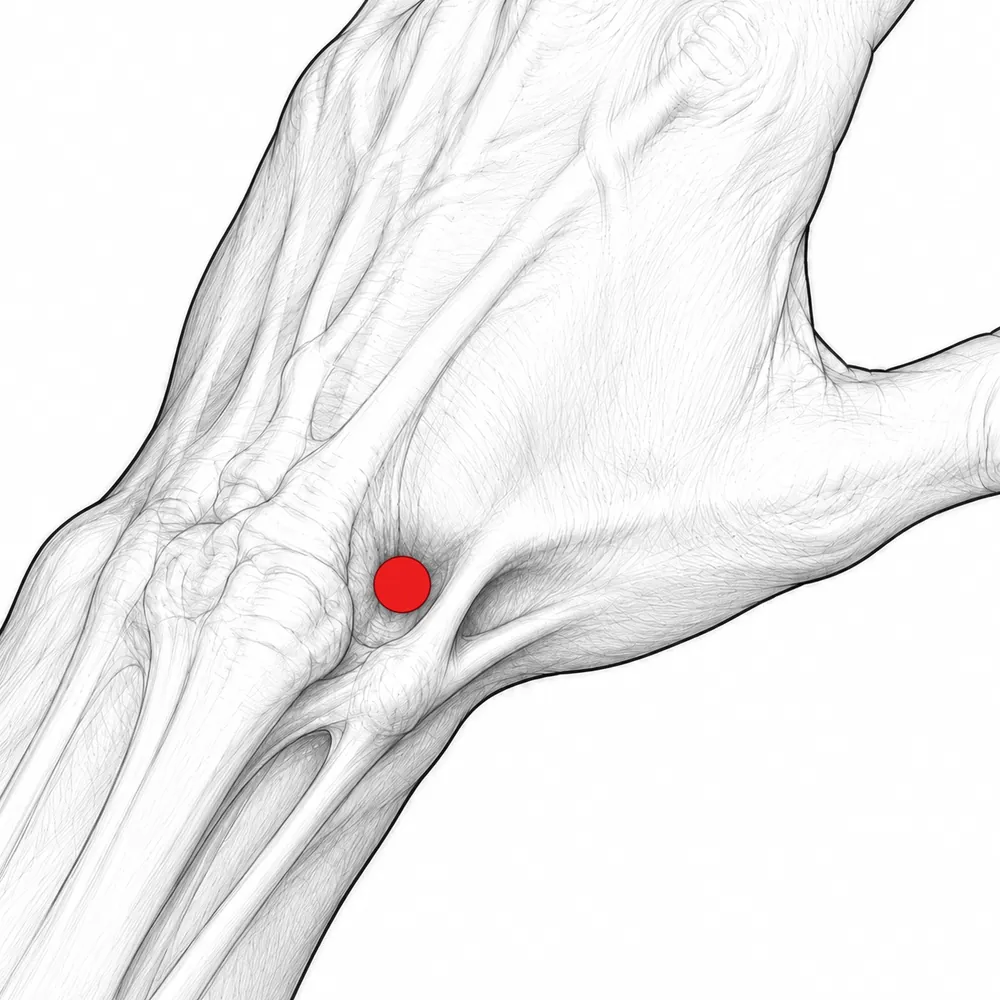
FIG.03 / ANATOMICAL SNUFFBOX Anatomical snuffbox (thumb side of the wrist) measurement location: the hollow that forms when the thumb is spread (red dot) ANATOMICAL REFERENCE
⑤ · ⑥ Order 5 → 6 (both sides)

Anatomical snuffbox (thumb side of the wrist)

Measure the hollow that forms on the thumb side of the wrist when you gently spread your thumb.
  • 1With the back of your hand facing up, stretch your thumb outward (spread it).
  • 2A triangular hollow bordered by two tendons appears between the base of the thumb and the wrist. This is the "anatomical snuffbox."
  • 3Measure the center of that hollow. Do this on each side.
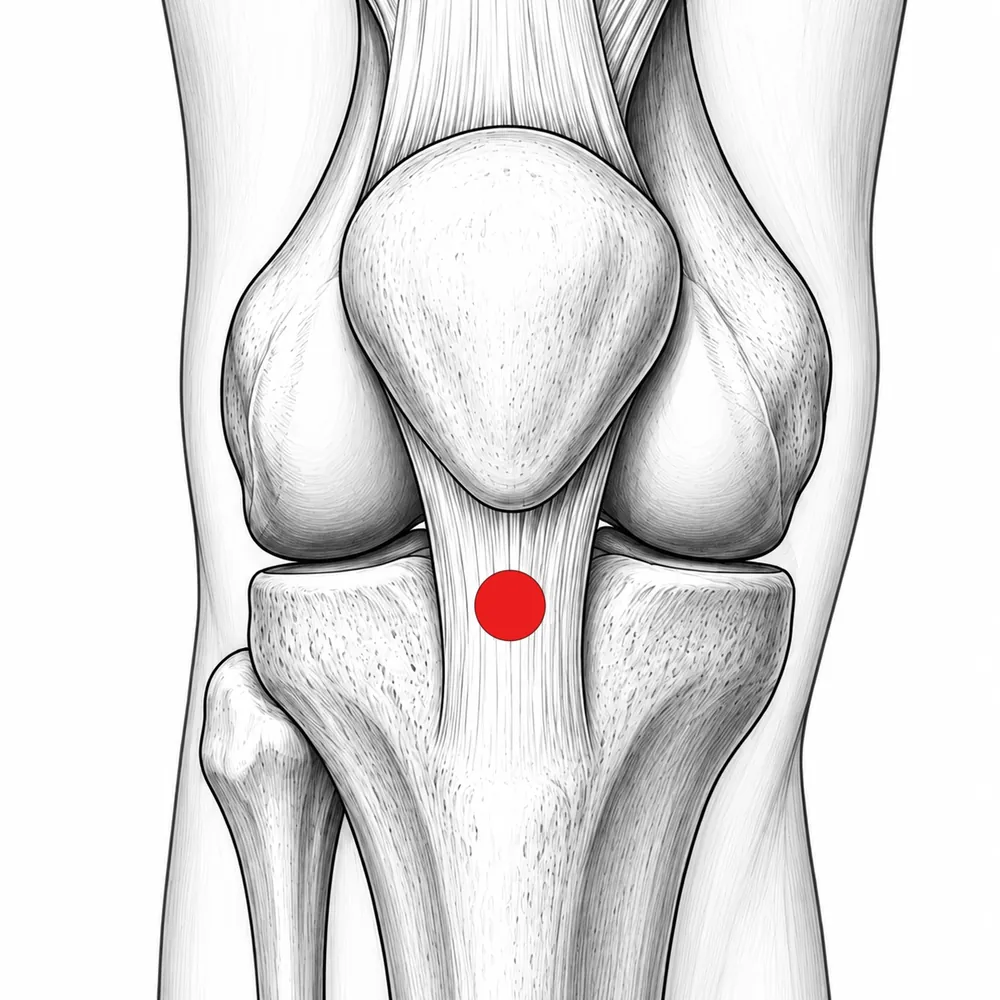
FIG.04 / PATELLAR LIGAMENT Patellar ligament (below the kneecap) measurement location: the ligament just below the patella (red dot) ANATOMICAL REFERENCE
⑦ · ⑧ Order 7 → 8 (both sides)

Patellar ligament (below the kneecap)

Measure the ligament just below the patella (kneecap) that runs to the shinbone.
  • 1Bend your knee slightly and feel the lower edge of the kneecap (patella) with your fingers.
  • 2The firm, cord-like part (ligament) running from below the kneecap toward the shinbone is your landmark.
  • 3Measure the center of the ligament just below the kneecap. Do this on each side.
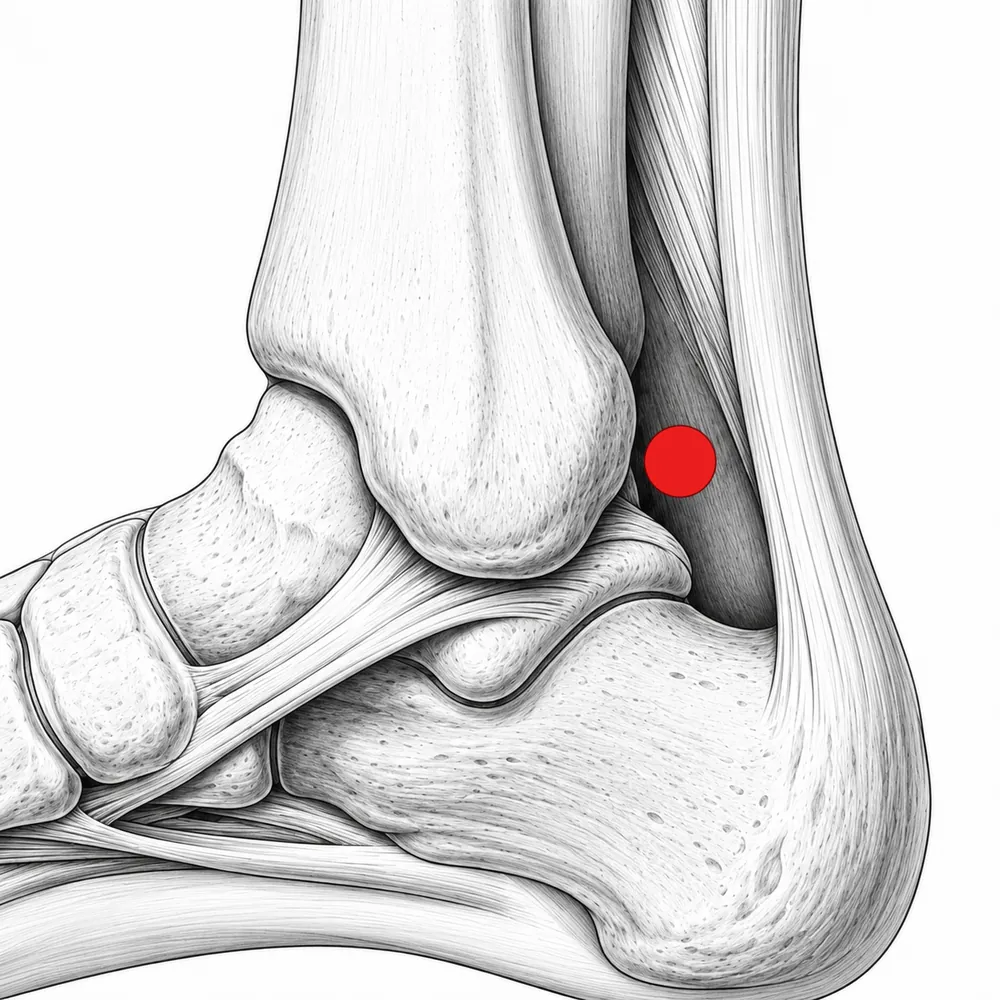
FIG.05 / MEDIAL MALLEOLUS Behind the medial malleolus (behind the inner ankle bone) measurement location: the hollow between the malleolus and the Achilles tendon (red dot) ANATOMICAL REFERENCE
⑨ · ⑩ Order 9 → 10 (both sides)

Behind the medial malleolus (behind the inner ankle bone)

Measure behind the inner ankle bone (medial malleolus), in the hollow between it and the Achilles tendon.

  • 1Locate the protruding bone on the inside of your foot (the inner ankle bone).
  • 2The hollow that forms between it and the thick tendon running toward the heel (the Achilles tendon), just behind it, is your landmark.
  • 3Measure the center of the hollow. Do this on each side.
STEP 4 · SEND DATA

After measuring, send your data

Use "QR scan" in the browser where you're logged in to AI coaching to read the QR code shown on the sensor's LCD, and your measurement data is sent. ※ Scan the QR on the sensor screen, not one on paper.

See how to send data
📖

When measurement isn't going well

In most cases, the surface condition of your skin is the cause. Wipe off sweat and sunscreen, and operate slowly. Care and safety instructions and the Terms of Service are in the User Manual.